December 15, 2020 |
James MessiBeaxy – a U.S. crypto exchange with industry-leading security, low fees, and more major fiat pairs – is the latest exchange to support the Gunthy ecosystem. Now, Gunbot users can connect to Beaxy without it counting towards one of their Gunbot API slots, which means you can use the starter version of the license to enjoy trading with Gunbot on multiple exchanges for free. Additionally, Beaxy has listed a GUNTHY trading pair for users to be able to buy tokens to effortlessly upgrade their license and unlock advanced features like bitRage and Market Maker.
BitRage and Market Maker yield the best results when the fees collected by the exchange that they are being used on are low. Fortunately, Beaxy offers a tiered fee reduction and matching program. If you are moving from another exchange, submit this form to have your fees matched from an approved exchange for the next 30 days. Otherwise, check out the table below to see how the incentives for using the exchange’s native token to pay fees scale exponentially.

Better Entry and Exit Levels
Trade Bitcoin against a base currency of USDT, USDC, USD, EUR, GBP, AUD, CAD, and JPY or, enjoy trading any of the 35 other cryptos listed on Beaxy. The liquidity offered on Beaxy’s trading pairs is priced from a global book which means that you are receiving the fairest price across 29 different crypto exchanges.
Advanced tutorial: Gunbot on Beaxy
Gunbot is an intuitive automated trading platform with advanced capabilities that make it the ideal choice for digital asset traders. When using Gunbot, you can build and backtest a strategy that is tailored to your style of trading or utilize one of the prebuilt strategies that are designed by experts. Gunbot features more than 100 indicators that can be combined to deploy a more comprehensive trading bot with increased performance.
Getting Started with Gunbot
Before jumping in the pool, you will need to purchase a Gunbot license. While there are several tiered options for a license, the starter license will allow you to connect to Beaxy and one other exchange while running up to three simultaneous trading strategies. Gunbot licenses are sold only through authorized resellers. Once you have picked a reseller and purchased your license, follow these steps:
● Download the Gunbot software files from the Telegram channel Gunbot Announcements for which you will receive access and a link by e-mail from your reseller. Use Telegram search to find the files you need for your operating system. (Windows, MacOS, Linux, and ARM-compatible; this tutorial is built on MacOS)
● Download and unzip gunthy-macos.zip
● Download and unzip macos_beaxy.zip
● Delete the gunthy-macos file from the macos_beaxy folder and replace it with the new gunthy-macos file you downloaded separately.
● Open Terminal and enter cd /Users/YourUsername/Desktop/macos_beaxy
● Type the command ‘./gunthy-macos’ and hit enter (*do not include quotation marks).
● Go to your internet browser and type ‘localhost.5000’ in the search bar
● Make a password for your Gunbot account
● In the dropdown titled Select Your Exchange, select Beaxy
● Open a new browser tab or window and go to exchange.beaxy.com and log in to your Beaxy account.
● Once you are logged in, click on your e-mail address in the top right, then select My Account
● On the lefthand side of the window, select the option API Management
● Create a new API Key and Give it a label (i.e. Gunbot key)
Go back to the Gunbot Dashboard and input the API Key you just created on Beaxy into
the API Key field under Connect exchange in the Gunbot portal.
● Input the Private Key from Beaxy into the API Secret field
● Input the exchange fees (0.25% for taker and 0.15% for maker orders)
● Enter the public wallet address of the ERC20 wallet you set up for deposit of your
GUNTHY tokens (note: this was done with the purchase of the Gunbot license.)
Configure Your Bot
Start with Pairs at the top of the Gunbot platform window.
● Select beaxy as the Exchange
● Enter in reverse order the pair you want the bot to trade. So if it is the BTC-USDC, enter ‘USDC-BTC’ in the Gunbot user interface.
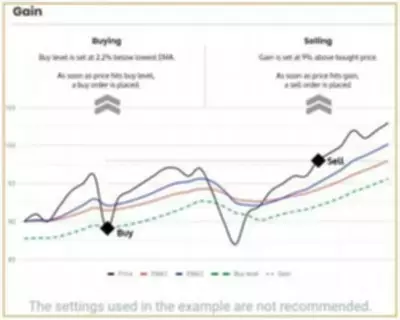
● Select the strategy you wish the bot to implement. Gain is the easiest strategy to get started with if you are unfamiliar with trading bots. Gain buys and sells based on the Exponential Moving Average of an asset (see below).
● Click ADD and go to the top of the screen and click Save Changes.
Next, click Strategies in the top left of the user interface, find gain (if that is the one you chose to set up), and click on it. Under the Buy section, set your buy level according to how frequently you want the bot to trade. If you want the bot to trade with a moderately high frequency set it to 0.2 and follow these steps:
● Click over to Sell and set your Sell level.
● Click Balance and set your trading limits (if you are using the USDC-BTC pair we discussed earlier, then these numbers will be in USDC). If you set your Trading limit to 150 USDC, the bot will always trade 150 USDC on every trade it makes.
● Below Trading limit set your Min Volume to buy and Min Volume to sell in USDC.
If you want to enable Dollar Cost Averaging (DCA) to bring down your average cost buying dips:
● Enable Double Up if you want Gunbot to average down the dollar cost when the price goes down after a buy order.
● You can tweak the settings based on what you are comfortable with – this strategy is great but sometimes requires more base currency to be effective. Estimate the parameters that would work for you here.
Under the Misc Tab, find the field labeled Ignore trades before. Open a new browser tab or window and go to https://currentmillis.com to obtain the current millisecond time. Copy the large number (which is the current millisecond time) and paste it into the Ignore trades before field. Then find Liquidity gain and turn the switch to off.
Important: Before starting Gunbot, go to Beaxy Exchange and zero out your quote currency on the pair you will be trading with Gunbot.
For this example, you would need to sell all your BTC into USDC before starting Gunbot on that trading pair. Before making any configuration changes, be sure to stop Gunbot from trading. The button to Start/Stop trading is located at the top right of your Gunbot UI.
Become a Gunbot GURU
Gunthy LTD has set up an impressive Wiki with detailed chapters on every feature built into Gunbot – what the feature is, what it is used for, and how to set it up correctly – are all questions you can get detailed answers to by exploring the Gunbot Wiki.